
Last updated: April 25, 2015
The origin of this tutorial
This scratchboard tutorial was born out of my desire to give more access to this beautiful medium. When I started out doing scratchboard, somewhere around 1992, there was very little information available on it. Scratchboard and its associated tools were available at most art stores, but there were no instructions. Asking the store employees didn’t help. Nobody seemed to know anything about it.
Things have changed a great deal since then. A Google search now reveals a wealth of written and visual information. Searches for images show the wide variety of scratchboard styles – some very impressionistic and others almost photo-realistic. Video clips on YouTube demonstrate techniques. Scratchboard still has to be explained to most people, but there is so much more available to those who are seeking it out. There are organizations to join like the International Society of Scratchboard Artists. There are Facebook groups for scratchboard artists. There is even a book on scratchboard that was published relatively recently.
My goal for this tutorial is to keep the tradition alive and save you some of the trouble I went through in my quest to explore the medium of scratchboard. I have worked in scratchboard for close to 20 years now.
I don’t claim to know everything and I wouldn’t say that my methods are the best for everyone. For example, some artists like to start with white scratchboard and add ink to specific areas. I prefer to start with black, pre-inked scratchboard. I give you my method and you are free to modify it to suit your own needs. Have fun!
Scratchboard: How does it work?
The scratchboard surface starts out solid black. When you scratch it you get a white mark. If you’re lucky these white marks eventually end up creating a picture.
A common mistake
The first mistake people usually make is drawing everything with a white outline, like they would on a chalkboard. They don’t get the result they intended.
they often do this…

when what they really want is this…

In the second example you can see how black lines are made by scratching on either side of them. It’s a lot more work but the result is much better. I usually start by pulling out the bright areas first. In the cartoon above I might start first with the whites of the eyes, then the upper and lower eyelids, then the shape of the head, and finally, the background. When I reveal the shapes first, the lines take care of themselves.
When I sketch with pencil or ink I start building up the shadows first. When I work with scratchboard I start with the highlights first and make my way toward the shadows.
It’s not a negative
People often say “So, it’s like a negative. You have to train your mind to think in reverse”. It much simpler than that. Though it may seem like I am working in reverse because I am using white marks instead of black, the result will not be a negative image.
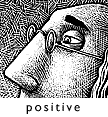
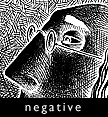
In the positive image above, the highlights and shadows are in the same places they would be if the picture been drawn with ink. The negative is on the right for comparison. It’s the positive image I’m after.
Get good scratchboard
In theory scratchboard is a pretty simple product. A piece of paper or board is coated with a layer of white clay material and then sprayed with a thin layer of black ink. The diagram below shows a cross section of scratchboard that has been magnified and separated to show the layers.

Despite the simplicity, good quality scratchboard hasn’t always easy to find. Don’t be tempted by the thin, flexible stuff that has a shiny, black surface and is about as thick as a postcard. This cheap scratchboard is not worth buying in my opinion, at least not for serious work. The ink layer is too thick and too hard, making it difficult to make crisp, clean scratches. Unless your scratch tool is perfectly sharp it will often skip on the hard surface. Mostly importantly, the white layer is very thin. This means that, as you’re scratching nice and hard to get through the black, the blade may go right through the white layer into the paper underneath. This makes a fuzzy gray spot on your picture that’s pretty much impossible to repair. Game over.
I have strong opinions about student-grade art products. I don’t buy them anymore. Over the years I’ve tried to save money by buying inferior paints, brushes, paper, scratchboard, etc. The savings aren’t worth the frustration.
Ampersand Scratchbord
Today Ampersand Scratchbord is what nearly every serious scratchboard artist is using. It the best option for work that is going to last, and it’s got a great surface. It wasn’t available when I started, but in recent years it has become easy to find in art and craft stores. It is stiffer, thicker, and heavier than previous paper-based scratchboards. The board itself is very durable and flat. It comes in a wide variety of pre-cut sizes, from very small to very large.
Essdee Scraperboard
Before Ampersand there was Essdee. Many years ago I read an article in Step-by-Step Graphics which showcased the work of Mark Summers (Jan/Feb 1992), the best-known scratchboard artist at the time. Among other things he talked about Essdee Scraperboard as being easy to work with. I located some and found it to be excellent. I used Essdee exclusively for years. When I was doing a lot of illustration work it was great. I could easily cut it to any size, and the surface was superb. It did have a tendency to warp, especially at large sizes. When I started working on pieces I wanted to frame, I switched to Ampersand boards. I heard that Essdee recently reformulated their boards with thinner board and shinier ink. The reviews aren’t good, but I haven’t tried it myself to confirm.
Scratch tools can be basic
You don’t need special tools to get started with scratchboard. Hobby blades, commonly found at hardware and craft stores, are not expensive and yield excellent results. Though art stores sell specialized scratchboard points, they are not required to do great work. The tools you use will depend on your style and preferences. In the end, you just need a sharp object (usually metal) to put marks on the board.
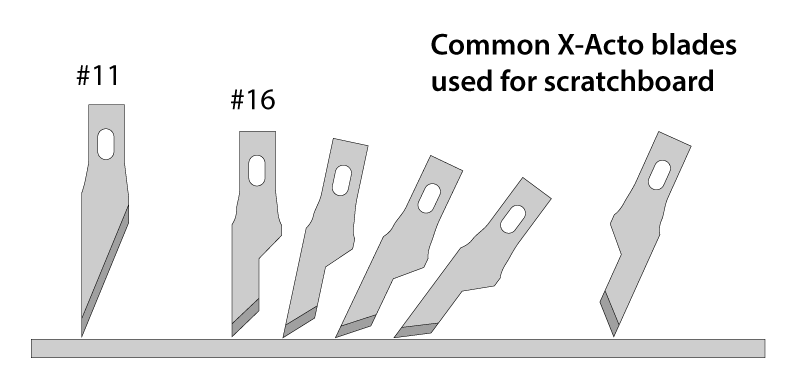
When I was doing a lot of illustrative work, I preferred the #16 Xacto blade (see image above). These blades can make a wide variety of lines. Depending on the angle of the #16 blade, it can scratch thinner or fatter lines. For detailed work the standard Xacto blade (#11) is a good choice. Even finer lines can be achieved with a #11 scalpel blade. In addition to Xacto-style blades, artists are using tattoo needles, specialized carbide points, fiberglass brushes, erasers, and anything else they can think of to make unique marks.
Shown below are some of the tools I use.
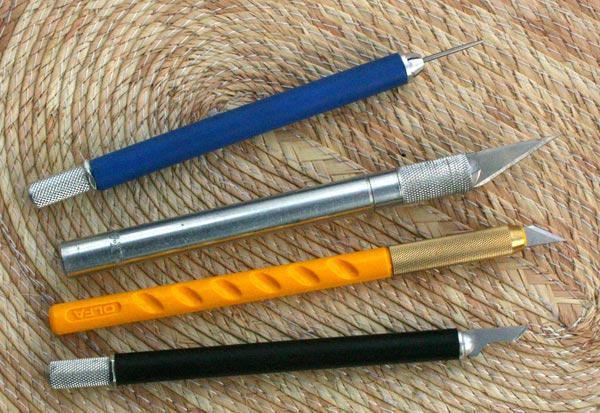


Just remember, even with all those interesting options to choose from, you really can create fantastic images with a simple X-Acto blade.
Mistakes can be fixed!!!
I have read too many times that scratchboard is an unforgiving medium and making a single mistake forces you start all over. This isn’t true. Unless you scratch completely through to the white clay layer, mistakes can often be fixed easily. Even then, Ampersand makes kits to fix the clay as well.
The concept of scratchboard is scratching through the ink to reveal the white of the clay underneath. So, if you make a mistake, you just put that layer of black ink back on. Presto! All fixed. How do you put the ink back on? It can be applied with a brush, pen, or airbrush. The thinner the layer of ink, the easier it is to re-scratch. Ampersand sells a special black ink for repairs, and Faber Castell makes “Pitt” pens that match the color of the Ampersand ink pretty well.
Once a correction is made, the ink may shine more than the matte finish of the scratchboard. I gently pat the ink line with my finger to take the shine off and let it blend in. I do this while the ink is still a bit wet. Ampersand Scratchbord has a very smooth surface so the better you can match the characteristics of the original surface, the less you will see the repair.
Also, my hands are not very moist or oily. If yours are, I would use a gloved finger to blot the ink. If you have moist or oily hands you might consider cutting the fingers off of a photographers’ darkroom glove like below.

Pens
An airbrush is a great tool for fixing mistakes on scratchboard, but pens work just fine for me. There is an art to doing this that just comes with practice.
I started out using technical pens (rapidograph) but when I would correct an area several times the layers of ink got pretty thick and flaky. The ink also doesn’t blend well with the color of the scratchboard and the mistakes are more visible.
Pigment pens (below) are much better. Pigment ink lays down very black. It’s also very thin so it doesn’t build up layers.
Somewhat recently I started using Faber Castell Pitt Pens after making a fairly large repair on an Ampersand board. Using my other pens I had a hard time getting the color and shine to match the original surface of the board. The repair was more visible than I was comfortable with, so I went looking for an alternative. The Pitt pens tend to match the color of the Ampersand boards better than my other pens. It may sound strange but black inks can vary slightly in color as some are more brown while others are more blue. There are also differences in how they shine. The differences in the ink of the board and the ink of the pen may not be apparent if you are making small marks, but the larger the repair, the easier it is to see the difference. This becomes most important when you are working on a piece that you plan to frame or sell.

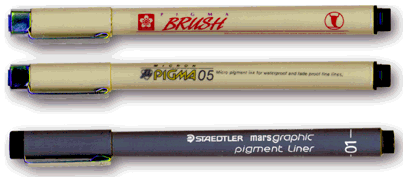
In the past I have used the Staedtler Marsgraphic Pigment Liner (bottom) and the Sakura Micron Pigma (middle) with good results. The Sakura also comes in a brush tip (top). My favorites for years were the Staedtler pens. They have a nice ink in my opinion, and they also have a wide calligraphy tip that I’m a big fan of.
I usually buy size .005 or .01. These work for most small repairs and for crosshatching. I like to hatch ink lines (black) across scratched lines (white) to create textures.
Pigment pens tend to clog temporarily with scratch dust so it’s good to have at least three. If one clogs I will write on a piece of paper to get the ink flow going, and then cap it for a while until it’s ready to go again. The pens with calligraphy or brush tips don’t clog and are great for making larger corrections.
Most art stores carry these pens. Avoid any kind of pen that would stain the white layer of the scratchboard. This would include anything like a felt tip marker or Sharpie. These inks stain too deeply. It is difficult to scratch back through to white if the white has been stained black by a magic marker.
Sandpaper
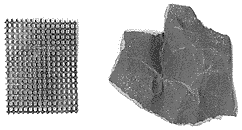
Sandpaper can be a real time saver, though it really depends on the type of work you do. I don’t use it as much as I used to, but if you need to take the ink off of fairly large areas, it does a nice job. I used to use it to get all the extra black off the borders of my illustrations, which could be time consuming with a blade. I would use a small piece of fine drywall sanding screen (below left) and then finish the surface with 320 grit wet/dry sandpaper (below right).
Sandpaper can also help with some corrections. Sometimes when a scratchboard surface is re-inked the grooves left by the previous scratches give a bumpy look to any new scratches. When this happens I use a tiny piece of fine sandpaper to smooth the surface before re-inking. I am careful not to sand too much.
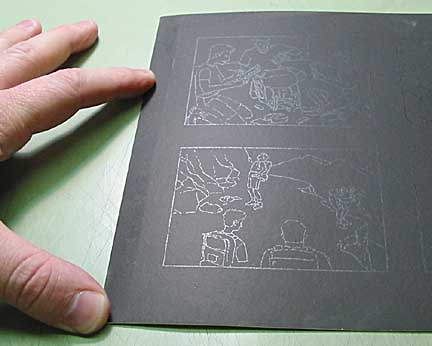
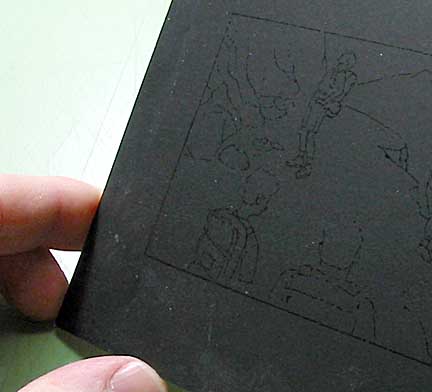
Transferring the drawing
So, you have this great drawing that you want to do in scratchboard. How do you get the drawing onto that black scratchboard? There are several methods for doing this. Some work better than others depending on your preference. My current favorite is Mona Lisa Super Chacopaper made by Speedball. Michael’s generally carries it.
Here are the methods I’ve tried:
Direct Drawing on the Scratchboard
This isn’t really a transfer method, but it’s the easiest way to get an image onto the scratchboard. I would use a pigment pen for this. The ink has enough shine to make it visible even after it dries. It’s good for simple drawings.
Ballpoint Pen INDENTATION
This is a method I used to use with good results when I was using Essdee Scraperboard. It would work with any paper-based scratchboard, but it probably won’t work with the hard surface of an Ampersand baord. To try it, place or tape your drawing on the scratchboard with the image face-up. Trace over the lines of the drawing with a fine ball-point pen. This leaves indented lines on the scratchboard that can’t get brushed away. When applying pressure be careful the drawing doesn’t shift.
Transfer Paper
Early on in my working with scratchboard I tried using a yellow colored transfer paper. It was a disaster. The fragile lines got brushed away with the scratch dust and started to disappear halfway through the illustration process. It bothered me so much, I avoided the use of transfer paper for years after that. In more recent years I read about how other people were having much better results with it. So, I tried it again with much better results.
Saral transfer paper is a popular brand that most art stores carry these days. I tried it and the lines are very white and surprisingly durable. For me the lines are too heavy and they are hard to get rid of.
Another product, Super Chacopaper, gives an even better result in my opinion. As I stated earlier, this is my transfer method of choice. The transfer lines don’t lay down quite as thick, a good thing, and extra lines wipe away easily with a lightly dampened paintbrush tip.
I take my drawing (or a copy of it) and attach it face-up to the board with a tape hinge. This allows me to pull the drawing away or put it back as I please without losing proper alignment. The white transfer paper is used between the drawing and the scratchboard. If I lose some of the lines I can put the transfer paper back, hinge my drawing back down, and trace them back in.
Xylene
This method is perfect if you want to make a transfer once and not have it wipe away. Because it doesn’t require tracing, it saves time. It’s great for very complicated drawings that you don’t want to spend time retracing. It can take some practice to get it right, but I have had excellent results with it.
BUT, I wouldn’t recommend this method for everyone. For starters, Xylene is a very smelly solvent, and could pose health risks if used improperly. Also, the leftover transfer lines may show up more than you would prefer once the piece is finished, so if you are doing gallery work, this probably isn’t the method for you. On the other hand, for illustration work that will be scanned and adjusted in Photoshop, this is a fast, and reliable transfer method.
Here’s an explanation of how, and why, it works. When xylene comes in contact with the toner (anything black on a photocopy) the toner gets soft and sticky. The sticky toner will transfer to anything that touches it. In this way a photo-copied drawing can be transferred to another piece of paper. When the xylene evaporates the toner hardens back up. This works great for transferring to scratchboard.
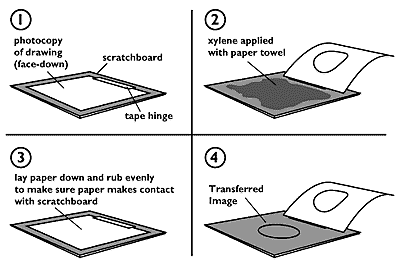
For this you need a photo-copiedor laser-printedimage of your drawing. Prints from ink-jet printers will not work. It actually works best if the image is a mirror image of the original; if not, the image will be backwards when you make the transfer. I used to draw on mylar, which is pretty transparent, so I could flip it over and make a mirror image on the copy machine. These days I just scan a drawing into the computer, flip it, and print it out on the laser printer.
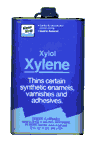
Get some xylene from a hardware or paint store. Position the photocopy of your drawing face-down on the scratchboard. Tape one edge of the photocopy, like a hinge, to the scratchboard–this will keep the paper from shifting. Pull the photocopy back to expose the black scratchboard surface. Put some xylene on a paper towel. If the whole paper towel is wet you’re using too much. Wipe it around on the surface of the scratchboard. The surface should be evenly coated and glossy wet, with no evaporation–don’t wait too long or it will evaporate. Quickly lay the drawing back down on the scratchboard and rub lightly to make sure the photocopy toner makes contact with the xylene. When you think it’s been evenly rubbed down–don’t wait too long–then pull the drawing back and the drawing should have transferred. If it doesn’t work just use xylene to wipe it off, then try again with a new photocopy.
Once the transfer is made the scratchboard is ready for work. It doesn’t take long at all for the toner to harden. In good light the transferred drawing stands out nicely on the black surface of the scratchboard. It is durable and won’t brush off.
Xylene is pretty potent smelling so you’re going to need good ventilation. I go outside or use my garage if it’s cold or windy. If you are going to use xylene, please read the labels and be aware of the dangers. My exposure to the fumes isn’t frequent or for long durations, but I am concerned enough that I don’t use it inside my home. I either work outside or in a well-ventilated shed. I’ve heard of so many people having problems with solvents of all kinds. This isn’t going to stop me from using them, but I don’t want to breathe the fumes any more than I have to. When I’m doing a xylene transfer I keep a clean, empty metal paint can nearby. Right after making the transfer I put the paper towel and the photocopy into the paint can and place the lid on top. If I’m indoors this keeps the fumes under control until I can take it outside to air out. If I’m outdoors it keeps the solvent-soaked papers from blowing away. When I’m finished I take the lid off and let all the fumes evaporate. Then I throw the paper towels away or reuse them. I try not to get xylene on my hands. This stuff will dissolve plastics so be very careful.
The finish
Once you have a drawing transferred, it is up to you to decide how to do the rendering. It is all a matter of style. Some artists use thick strokes, while others make tiny scratches. Some keep it very linear, while others like to crosshatch. Coming up with unique textures can make your work more interesting. Take a look at the work of other artists to see how they have solved the same problems you are facing.


Color
Ampersand makes a set of colors specifically for scratchboard work, and I have seen some really beautiful work done with them. Some artists are using Derwent Inktense pencils to color their work. Colored pencils are another method for adding color. There are many more possibilities.

Diana Lee is one artist who does amazing work with color, especially on animals. She has an excellent tutorial, and I believe she has been the inspiration for many of the artists doing color work today.
If you are nervous about adding color and fear you might ruin the piece, you can always take a high resolution scan beforehand to make sure you preserve the black and white version for make prints. If you are creating illustrations that will be printed, you also have the option of adding the color later using Photoshop.
Books
A Google search for scratchboard images will turn up some really nice work. To really get a true appreciation for the details, it’s even better to look at originals, or at something printed. My favorite book on the subject is Scratchboard for Illustration, by Ruth Lozner (Watson Guptill Publications 1990). It is out of print, but still obtainable if you keep an eye out for it on eBay. Along with information about the medium Ruth has compiled an excellent collection of work from the best scratchboard illustrators. I highly recommend getting this book for all the examples of different scratchboard styles. No, I’m not in it.
Meet other artists
The best art forum I know of is www.wetcanvas.com. They have a section for scratchboard art that gets a lot of traffic. There are some incredible artists there. Everyone is very friendly so go check it out!.
Hi as you know my name is Maree Green. I wish too ask you for or how I could get those tools you have the ones with wooden handles. As such I love your tutorials. So could you please guide I have tried at least a few nights looking for them. Could you help me please. Thank you. Maree
Hi Maree,
One source for that type of tool is from Eklund Crafts. You can choose the handle and the tip. They are very nicely finished. Here is the website: http://eklundcrafts.com/product/scratchboard-tool/
Another option is to craft it yourself. It requires more effort, and the results may not be as pretty, but these tools work great. I wrote a post on some of the scratch tools I have: https://scratchboard.org/cnc-engraving-bits-as-scratch-tools/
I hope this helps.
Russ
I could not find information on how to do the fingertips of a human hand. I need to know for an art profect i am going to make for my mom. please help me.I am not that good with scratchboard.
thank for this article! I’ve done scratchboard for a short time years ago and haven’t gotten back to it until now.
I am refreshing my mind and I want to say thank you for inspiring that little motivation to work on new scratchboard. 🙂
I am so happy to find you….i am new at this and am looking to get started.
Thank you for sharing. anne
hello
what is the best way to clean off traced lines using white transfer paper from the finished scratchboard .
Thank you
Pingback: Art 3 – Scratchboard – Odilon Redon, Dreams – 10/6 | mygbkartclasses
Very instructive and reliable. I thought I was just starting a hobby holiday drawing but it seems I’m getting addicted to the medium hence my research on the technique. I bought 4 scratch boards for nothing and rediscovered the charm of it and drew them in a row. But now it’s getting more “serious”. THANKS for sharing. ;-))
Hello,
I have some oil marks from my hands. Do you possibly know any techniques on how to remove these greasy stains from the scratchboard?
This was very thorough and interesting tutorial. You have sparked my interest in this art form. Thank you.
Hello, thank you for such a great tutorial. I have learned so much. I do have one question though. After you are done with your image how to make it so that you can frame it without worry of damage? How do you prevent further scratches?
First off. Amazing site, very informative. Thank you for sharing your time consuming trial and errors with everyone. Before I start babbling I am interested in scratching items other than the board/paper. I would love to try this on pieces I can hang on my wall. I want to coat a motorcycle helmet or gas tank white then apply some opaque ink somehow in order to scratch it. Do you have any ideas where I can start my homework? thank you very much for your time best regards Steve B.
I generally spray with a matte clear coat after I’m done to make the surface more durable. But, I don’t think it’s a requirement. If I finish, and the surface looks good (no visible smudges or corrections), I will just frame it behind museum glass. There are thin spacers that go along the edge of the glass (and hide behind the inside edge of the frame) to make a gap between the glass and the artwork. If you decide to spray your artwork, it’s a good idea to experiment with the spray on a small spare board or a scrap to make sure there are no problems. Some people have had disastrous results with clear coat sprays.
Thank you so much for your answer to my question. I didn’t know about the museum glass frames.
Museum glass has almost no reflection. When you get your art framed, you have to request it. There are various brands and kinds of non-reflective glass. My framer has a display that shows the differences side by side.
What tools do you use for shading. Some examples do not look like hatch lines, but more like stippling but with soft edges.
Thank you,
Janet
How does the toner turn white on the black scratch board using the xylene transfer method? Wouldn’t it be black on black? I’m likely missing something here. Thanks for a great web site on scratch art.
Great information – you did our craft justice.
Thank you for your efforts!
Paul Hopman
Yes, it is black on black, but there is a shine to it that can be seen pretty easily. This transfer method is great for doing illustration work because the lines are durable, and a scanner doesn’t see them. On the other hand, unless the black lines scratched away, they are going to be visible by human eyes if you do a framed fine art piece. It may not be an issue, but it’s something to consider.
I have a very visible oil spot on the plain black background of my finished drawing. What do you recommend that I do/use to remove the oily spot ?
P.S. I learned so much from your tutorial. Thank you.
A matte finish fixative spray can be used to fix problems like oil smudges in the black scratchboard surface. I haven’t had any problems doing it, but I must warn you that some people have reported terrible results. Don’t spray a finished project until you have tested the spray on a scrap piece, or on a piece that won’t break your heart to ruin. Sometimes the spray doesn’t react well to the surface of the scratchboard and won’t lay down evenly.
Trying to remove the oil from the surface will probably create more problems than it solves. The surface is super delicate, and any rubbing will make it shine. A shiny mark is harder to hide with spray than an oily one.
Another tactic, and probably not one you would want to use, is to add to the design and scratch over the part with the oil stain.
I would recommend getting in touch with Ginger Gehres and ask her advice. She would probably be able to recommend a specific spray to use for best results. All of my sprays were bought years ago, so I’m not sure which one people are buying now. Hope this helps.
Do you have a recommendation for shading not using the fiber tool. I teach children and the fibers are too dangerous. Steel wool is not much better either.
Thank you,
Janet
The surface of Ampersand Scratchbord is delicate enough that an eraser will take the ink off, especially if you do multiple passes. A old-school typing eraser would probably work well because it has a small point and handles like a pencil. Faber-Castell makes one that rates pretty well on Amazon. As far as rectangular erasers go, Creative Mark makes an eraser called ArtStroke that is fairly abrasive. I tried it and does take the ink off pretty easily. The downside of using an eraser would be the possibility of making shiny spots on the surface. Hope this helps.
Great advice here, thank you very much. I have one question, i have used transfer paper and it works well the lines are very white and as you say durable. DO you have any tips to remove these when finished? Some of lines are thinker than hoped and Im struggling to remove them from the scratchboard. Any suggestions welcome. Many thanks in advance
Super Chacopaper comes off pretty well with a lightly dampened paint brush. I use a small, pointed watercolor brush with just enough water in it to pick up the lines.
I haven’t tried to remove a Saral transfer. I wonder if a kneadable eraser would pick up the lines without marring the surface of the board.
Great information got to give it a go, very informative there’s not such good info here in U.K.
Regards Tony
HOW DO I FIX A MISTAKE??? THIS IS FOR AN ART CLASS
HEEELPP
Hi! Thanks for your site, it’s very interesting. I’m french and it’s not easy to find answers about scratchboarding in my country.
I’ve learned a lot of things thank you.
I just have a tip for remove white saral paper without damage the board. I just do some moisture (or steam? I don’t know how to translate it in english) with my mouth, like you can do on sunglasses, and I gently pass a clean and soft tissu on it. It’s magic 🙂
great information here! I actually transferred my image with transfer paper but there is residue left from the taped edges. I tried to rub it away but it just got worse. Any recommendation I can do to get this off?
Thanks!!
Hi There,
How do you advise removing soft pencil marks off the scratch board?
Thanks 🙂
Thank you. I’m coming back to scratchboard after deviating into oils and then pastels and coloured pencils. I was looking specifically about combining coloured pencils with scratchboard and happened on your tutorial. It’s an excellent overview/primer, and now I feel ready and able to jump back in with more experience and knowledge than the first time. Thank you for the depth and clarity of your explanation.
Pingback: 7 Easy Art Tutorials to Help Anyone Get into Art | Why Do Art Bonus
Hi i am a art student in highschool and one of our projects is scratch art but on a paper,and me and my art teacher were wondering if there was a way to preserve the art after you finish your drawing. Like a spray or something so it doesnt get all scratched up.
I was wondering if there was a certain sealant that was used after your scratchboard picture after it was finished before framing it to preserve the scratboard pictures so it’s not damaged of finger prints or oil on my finished picture.
A wonderful site! Thank you, clear and very easy. Great to try and get back into scraper board. I haven’t picked it up for so many years and agree, the old products were limiting…so I stopped, but always loved it. I want to use it for one image in a book I’m illustrating, so not sure yet if I will use colour…but your site has given me great courage! And the confidence to try again, with inspiration from you. Thank you!!
Well…all my scratch board art looks like crap now lol. This guy is a master
Pingback: Art 3 – Symbolism, Dreams, and Fables – Redon and Gág – due 11/5 & 11/6 | mygbkartclasses
I wish to trim the board into a circle, without cracking the surface at the cut. Please advise as to how best to do this. I have been scraperboarding for some 72 years: the biggest work is the size of the lounge door! It took ages, but well worth it. Just a scratch!
Many thanks
Sorry for the slow reply, John. I haven’t been keeping up with this site very well. I think a router would be the best tool for making a clean cut. If you can find someone with a CNC machine, they could lay the board down on the CNC table, and the machine-guided router bit could cut a perfect circle. I think those tables have holes and a strong vacuum to hold the board in place. That is the approach I would take, though I’ve never tried it.
Love your art and the tutorial is very comprehensive. My main concern is using the fiberglass eraser since I’m not keen on getting the small glass particles in my skin or lungs nor brushing them onto the floor where our puppy is. Have not been able to find an alternative that would work as well or easily. Any ideas? Appreciate any feedback,
James
Sorry for the very late reply. I wouldn’t worry too much about those fibers. I doubt they are small enough to get airborne for lungs. And, even if they were, the body is pretty good at protecting itself from that kind of thing. In my opinion, even for the puppy, it would at most be a temporary irritant.