CNC engraving bits as scratch tools

I think it’s the nature of scratchboard artists to constantly look for new tools, even if their current set of tools works perfectly well. For example, I have done the majority of my work with #16 and #11 Xacto blades, and they have served me very well. But, tiny steel points don’t hold up forever, and eventually I have to reach for a new blade. Durability is probably the first reason a scratchboard artist would seek for a new tool that does essentially the same thing as an Xacto blade.

Several years ago a friend of mine did me a favor and made me some scratch blades out of discarded cobalt deburring blades. To try them out he let me borrow me a pin vise for a few days and I thought they were great. Not long after that came the flurry of activity in my life that involved getting married and moving across the country. The little steel blades were the last thing on my mind at the time, and lay forgotten in a storage box until last summer. When I finally looked at the bits again, I realized I didn’t need a pin vise. I could drill a 1/8″ hole in a section of dowel and insert one of the bits. They are great tools. I included a photo in a post back in August.

my-newest-scratchboard-tools

Of course, I wondered if might want to try grinding some of my own, and I couldn’t remember what they were and what material they were made of (later found out they were cobalt deburring blades). I thought they might be milling bits, but my searches turned up some bits that didn’t look like what I had. They actually looked much better. They were carbide steel engraving bits for CNC machines.

cnc-bits-as-scratchboard-tools

They look a lot like some of the fancy blades I’ve seen other scratchers use. They fit just right into the 1/8″ holes in my dowels. So, with even more excellent tools, I guess it’s time to dust off some of my works in progress and put these tools to use.

Russ McMullin – Owls, tree, and stars – progress and finish

My latest scratchboard is more illustrative than realistic.

owls-trees-and-stars

For it I borrowed the basic design of an owl that my sister burned into a wooden spoon.

michelle-spoon-owls

I wasn’t trying to achieve realism, but I wanted to include at least a hint of it. I started out by doing some sketches

owl-in-tree-sketch

owls-rough-sketch

And then I started refining:

owls-sketch-photoshop

owls-refined-sketch

Once I settled on the design, I transferred it to a 5×7 board with Chaco paper and red ballpoint pen:

owls-transfer

For scratching I used a sharpened steel point that a friend made for me. It works great and has stayed sharp.

my-newest-scratchboard-tools

Initially the leaves were way too bright and competed with the owls for attention. I inked over them with a Faber Castell PITT artist pen brush, waited for them to dry, and re-scratched them. Even then they seemed too bright:

two-owls-bright-leaves

So, I pushed them back a little further with a diluted ink wash using Ampersand “black repair” that comes with their set of scratchbord inks:

owls-trees-and-stars

The stars came last to give a background that wouldn’t compete with the owls. I’m feeling pretty good about the result. Now I’m trying to decide if I’m going to add some color.

First impressions of airbrush on scratchboard

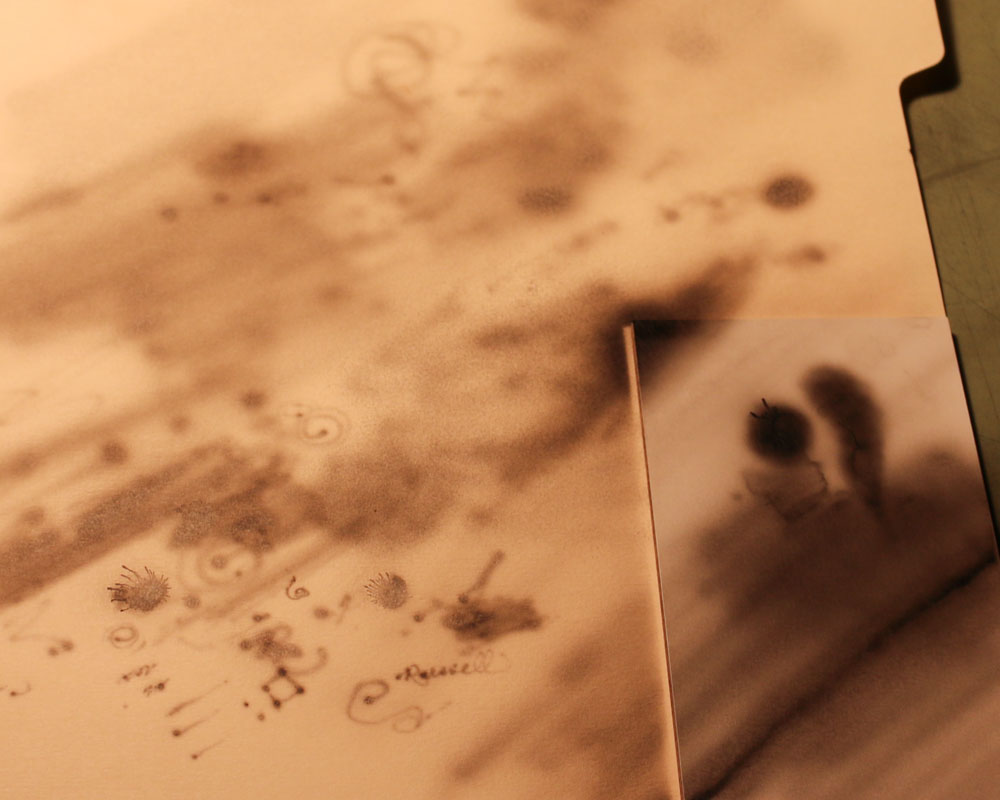
I found just a few minutes to experiment with the airbrush tonight. I first put straight water through the brush to get an idea of how it feels. When I was comfortable with the action, I emptied the water from the cup and wiped it out. I put several drops of Ampersand black ink (straight from the bottle) into the cup and started testing on a manila folder.

With about 20psi on the regulator I experimented with the MAC valve on the airbrush. By turning a little thumbscrew on the bottom of the airbrush you control the air pressure. Very handy.

As long as I was very patient I could get some fairly even gray patches. Building the ink up to solid black takes a while and it seemed I was prone to getting the area too wet. Then the ink would start to spider out. I probably had too much pressure and was working too close.

Dialing the pressure back gives a different pattern. Instead of laying down smoothly, the ink does a very fine spatter pattern. I really need to learn better control of the pressure.

But, even without being good at making solid blacks I can already see some very useful things the airbrush can do. Without much effort I can add a mist of gray to areas that may be overscratched, or that need to be pushed further back.

I used a little sample of Claybord when I got more comfortable with the brush. I made one corner a pretty solid black and made a gradient fade into white. As I got impatient I ran into more problems with spidering. The clay surface is harder and doesn’t absorb like the folder does. Airbrushing requires patience. My experiment looks pretty lame, but it was a very useful exercise.

When I scratched back into the airbrushed ink, I was pleased with the result. After a bit more practice and a better setup of my work area I will start working on something for real.

I need a better place to hang the airbrush

I need a better place to hang the airbrush

Manila folder and Clayboard sample

A manila folder worked well for an experimental surface. The Claybord sample is on the right.

Getting ready to try an airbrush on scratchboard

With the exception of the compressor, this is my setup so far. I got it all put together last night, and fixed a leak with teflon tape and a tighter connection. I’m just about ready to start putting ink through the brush.

parts-required-to-connect-airbrush-to-compressor

Here is an explanation of my configuration from left to right:

Air hose – 1/4″
It has 1/4″ female connections. I’m not sure how long it is, but this type of hose is easy to find at just about any hardware store. I’ve had this for years so I’m not sure what I paid for it.
male-to-male adapter – 1/4″ – $3
This is the type of item you end up making an extra trip to the store for. I didn’t think I needed one until I ended up needing one.
Quick disconnect – 1/4″ – $5
In case you are wondering how all of these fittings are 1/4″, it refers to the inside diameter, not the outside. It consists of a plug and a socket. The quick disconnect isn’t required, but it will make life easier when it comes time to put everything away. These are common items and can be found near the air hoses.
Air compressor regulator – $13
Because it’s more specialized to airbrushing, I wasn’t confident in finding this item locally. Art and hobby stores sometimes have them, but I opted for Amazon. If you search “airbrush regulator” on Amazon you will see what looks like the same design offered for different prices from different vendors. I picked one that had a 4.5-star rating. The main body has a control knob at the top to control air pressure. It has an arrow on the front to indicate the direction the air should flow. The pressure gauge is included, and attaches to the threaded hole on the front. The threaded holes on the sides of the regulator both accommodate 1/4″ air fittings. There are two 1/4″-to-1/8″ connectors also included. You may not need either of them. I needed one to fit my airbrush hose.
Airbrush hose – $10
I chose a brand called “Master Airbrush” because the price was right and it reviewed well on Amazon. It comes with 1/8″ connectors at the ends, regardless of what the picture on Amazon says. If I had purchased an offical Iwata airbrush hose I think I would have required a 1/4″-to-1/4″ connector to attach it to the regulator.
Moisture trap – $13
It’s hard to take a brand new airbrush hose and snip it in half, but that is how you install the Paasche moisture trap. The moisture trap comes with directions for installing it between the two sections of hose. There is a screw that can be removed to allow any condensed water to escape.
Iwata HP-CH – $241
There were cheaper sources for this model of airbrush, but I wanted to make sure I got it from a dealer I could trust. I ordered from Jerry’s Artarama. If I have any problems I know their store is about a half hour from my house.

Assembly

Assembly wasn’t difficult. Before leaving the hardware store I picked up a roll of teflon tape. I wrapped the threads of each 1/4″ connection with a few wraps of teflon tape. I had to re-do the 1/4″-to-1/8″ connection at the regulator because I could hear it leaking. I wrapped it with some additional teflon tape and went a little tighter with the wrench. That fixed it. I used a couple of small adjustable wrenches to assemble everything for the 1/4″ fittings. The 1/8″ connections were as tight as I could make them by hand, but I didn’t use tools.

Everything is working now as far as air is concerned. I took the time to see how the adjustments work on the regulator. I also experimented with the MAC (micro air control?) valve that is built into the Iwata HP-CH. Instead of touching the regulator, adjustments can be made quickly on the airbrush itself. Now that I have it put together and I’m comfortable with the controls for making adjustments, the next step is to shoot some ink through it. That will be another post.